Track Magazine Message Board
Probably the best deal on the market for track coaches is the Sprint Timer. If you already have an IOS device such as an iPhone or iPad, you can purchase the Sprint Timer App for only three dollars, or the Pro subscription (recommended) for only $5/year. If you add a couple of Walki Talkies, you have a powerful timing system that'll give you electronic results from any race, sprint or distance.
1. Download SprintTimer to your IOS device.
This program is for iPhone or iPad only, not Android.
https://appmaker.se/home/sprinttimer/
Look at this video for a quick idea of its power:
https://appmaker.se/home/sprinttimer/sprinttimer-videos/
There is a 2-week free trial; after that, it's a yearly subscription for only $5.
2. If you don't have a pair of small Walkie Talkies, get a pair
Click here for the ones I use.
If you don't have an IOS device, check out Ebay. There are lots of refurbished phones around, some for under $100. That's what I did. I use an Andriod phone but I bought a couple of iPhones just to use with this App. You don't need a carrier, buy one that's unlocked.
Once you do that, you're all set, although I do recommend that you install SprintTimer on a second IOS device. I'll explain why below. The SprintTimer website has a great blog with lots of examples on how to use it. I tried most of them. I made a 120-meter sync cable to connect the IOS to an electronic starting pistol. While that worked fine, it was too much of a hassle to move it to the other starting points. I purchased a portable router to connect two IOS devices via a WiFi connection. I found this to be a bit unreliable, especially for the longer throws. Finally, I bought the Walkie Talkies, and after a bit of experimentation, I found the best way to set the system up. I used this setup for all of our track meets last year, and several large middle school meets to time hundreds of runners with no problem, all to 1/100 of a second.
http://crowncity.com/middle (Scroll down to 2019 Track.)
Here's how to set it up.
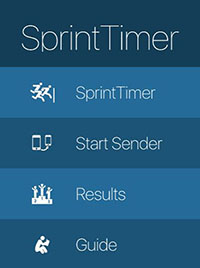
When you first run the app, you'll see the startup screen that lists the various parts of the program.
Start Sender is another program that allows you to send a starting signal via another IOS device, a WiFi Connection, or a dedicated cable. For the method I'm describing here, you won't' use it.
Results is where your races are stored.
The Guide has instructions, links to the blog, and other products.
Here's how to set up the Start Screen:
Press "Sprint Timer."
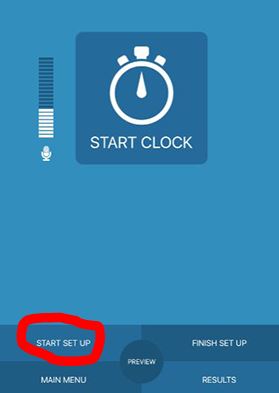
You'll see this screen:
Press "Start Set Up."
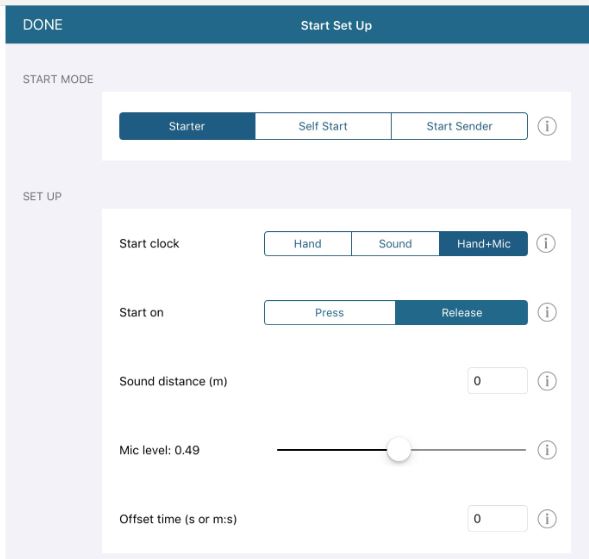
That takes you to this screen:
Sound Distance is for a sound source that's located away from the IOS device. It computes a time delay based on the speed of sound. Since we'll be using a Walki Talki this should be set to zero.. Offset time is for starting the clock after the race starts. You shouldn't need to change the Mic Level.
|
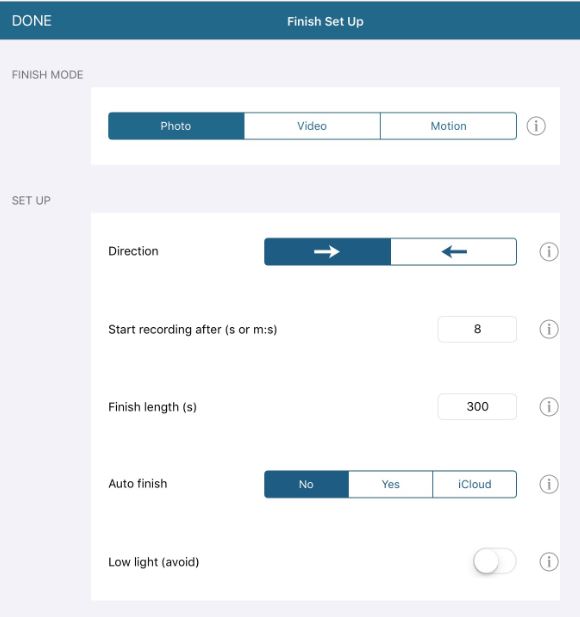
From the setup screen above, press "Finish Set Up."That takes you to this screen. For "Finish Mode," select "Photo." You'll do another setup with a second IOS set to Video. |
OK, here is how I use it.
I'll stand on a ladder or some other elevated platform with my iPhone and Walki Talki in hand.
The starter has the other Walki Talki in his free hand. As he begins the start sequence, he holds the transmit button down. This is cool because I can hear him going through the verbal or whistle commands. I can also talk with him before he starts the race. I'll hold the "Start Clock" button down until I see the smoke or hear the gun go off (remember I set the "Start On" button to "Release.) This is much easier than looking for the button when the gun goes off.
As the runners cross the finish line I make sure that the IOS image centerline is in line with the finish line. I've found that it's easy just to hand-hold it as opposed to using a tripod. Once all the runners have passed, I press the "Stop" button. Since you set-up the finish to "Hand + Mic," a screen pops up showing a graph of the sound the Mic Picked with a vertical line, usually at the point where the gun went off. The sound graph extends from about 1.5 seconds before the gun and about 1.5 seconds beyond. If the line isn't at the correct place, you can move it. You can also play the 3 second sound bite. Once the line is in the correct place press "Apply," and the difference between your releasing the button and the instant the gun went off will be applied to all times.
I use the "Hand +Mic" option rather than the "Sound" option for the start because I found the "Sound Option" described in the documentation is too sensitive. On paper, it looks great; you set the sensitivity to a point where a certain decibel level will start timing. However, in practice, I was never able to make this work reliably. The problem is ambient noise. If you set the level low enough so that the ambient noise won't start the timer, sometimes the report of the gun, or whatever starting device you use doesn't either. If you set the sensitivity high enough to trigger the start each time, often the ambient noise (such as the starter calling the start sequence, or his whistle) will start the timer and you miss the race. The "Hand +Mic" option, on the other hand, works every time. It just takes a few seconds to set the time with the sound graph after each start.

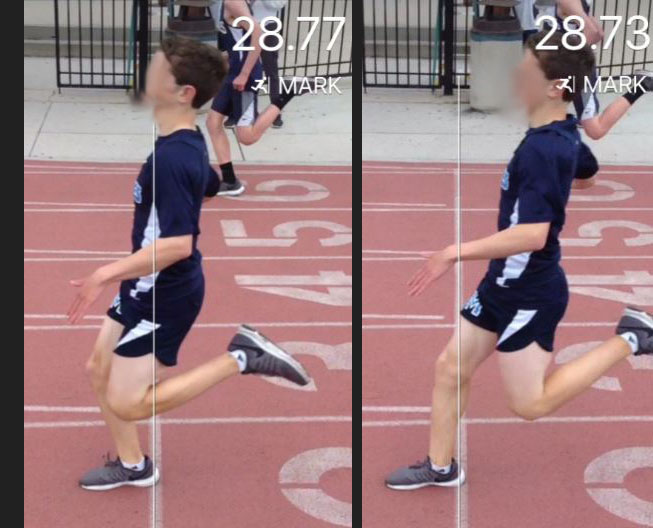
The next step is to scroll through the image for the times. Line each finisher up and press the "mark" prompt to save the times. Or you can write them down (or both). Here's an image from a middle school meet last season. It's part of the image at the top of this web page.
Scrolling through the image allows you to save the time for each runner.
In the screen shot to the right, you see the girl in the grey shirt ran 14.24 for her 100 meter dash. It takes only about a minute to get a time for everyone in the race. The times can be saved to a file or air dropped to another IOS device. The times can even be saved with the image itself, and the image can be saved for later processing.
The other IOS device (I use an old iPad) takes videos of the finish.
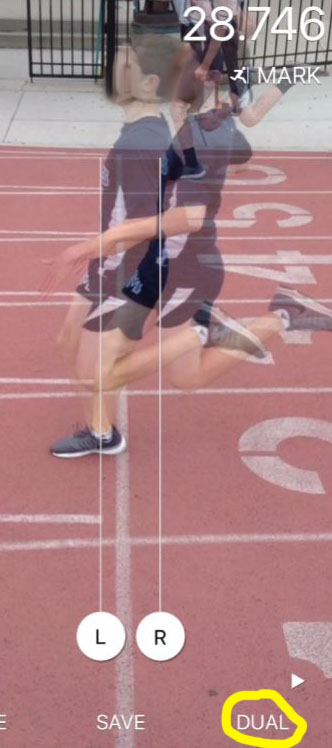
You can get the actual time by using the "Dual Tool." This presents an overlay of that image and the next image with left and right sliders. You move the sliders so that the left line is where the finish would be for the left image and the right where the finish would be for the right image. The program interpolates the time to 1/000 of a second. In this case, it's 28.746. Round up to 28.75. For our High School league cluster meets, I'll ask all the coaches to enter their runners in Athletic.net with marks. I'll seed the meet and print out heat sheets using Hy-Tek. We have the sheets at the finish line on a clipboard. The starter also has a copy. If there are any substitutions or combined heats, I can talk with the starter as he has one of the Walki Talkis. After the race, the runners come back to the finish line in their lanes, and I'll call out the time and place for each one. If there are errors in the lineup, it's immediately obvious. I'll have a worker write the times on the heat sheets and go on to the next race. This process is very fast, and the kids love it. They get their time before they leave the line. If there are close finishes that I can't sort out from my iPhone, the iPad taking videos sorts that out. If you don't have Hy-Tek and heat sheets, maybe you can use the method I use for our middle school meets. We have six schools in our league, and lots of the kids run the 100. At times there will be over 50 entered. What I do is assign each kid a number that they write on their hand. We line them up on the starting line, and I have a helper call (with a cell phone) a recorder at the finish line who will write the hand numbers for the lane they're in on a sheet for that heat. After the race, I'll call out the finish position and time for each kid while a recorder writes the times on the sheet. This also goes very fast. I do use Hy-Tek for the middle school results, but I don't seed the meet. For the lane events, I set it up for the max number of lanes allowed, which is 99. Then, when I enter the results, I'll just enter the hand-number and time onto the same heat. George Green |